Tuesday, December 1, 2015

Holidays 2015: Pumpkin Roll with Cinnamon Buttercream

I have been SO tired this pregnancy!! If it tells you anything, I made this pumpkin roll at least a week before Thanksgiving, AND another one ON Thanksgiving, and STILL never posted this recipe. Now, it's Decemeber 1st, and I am caving, simply because I have lots of other goodies I plan on making before Christmas. Is that really going to happen? I don't know, but a girl can dream, right? Let's hope I get a random boost of strength this month haha

Okay, so, this pumpkin roll is sooo good! I first had pumpkin roll back in high school, but it had cream cheese frosting. (I hate cream cheese frosting) IT WAS SO GOOD. Even with the cream cheese frosting, the pumpkin roll was so tasty and moist, I didn't even care what the filling was. But since this is MY take on the pumpkin roll, I decided to try things my way. A simple buttercream with some cinnamon in there to keep the flavors festive and spicy. I made two of these babies within a week of eachother and they were gone faster than the pumpkin pie and cheesecake! That's saying a lot!

If you decide to try the recipe, but you enjoy and/or prefer cream cheese frosting, you can absolutely substitute it for my buttercream, I'm sure it will still be SO tasty! :)

Enjoy!

----Pumpkin Roll with Cinnamon Buttercream----

3 eggs
1 cup sugar
2/3 cup pumpkin puree
1 tsp baking soda
1/2 tsp cinnamon
3/4 cup flour
*optional, 1/8 tsp ground ginger
*optional, 1/8 tsp ground cloves


Preheat oven to 375. Line a jelly roll pan with parchment paper. (you can use a 10x15 pan, mine is 12x17, and still worked great) Spray the paper with cooking spray.

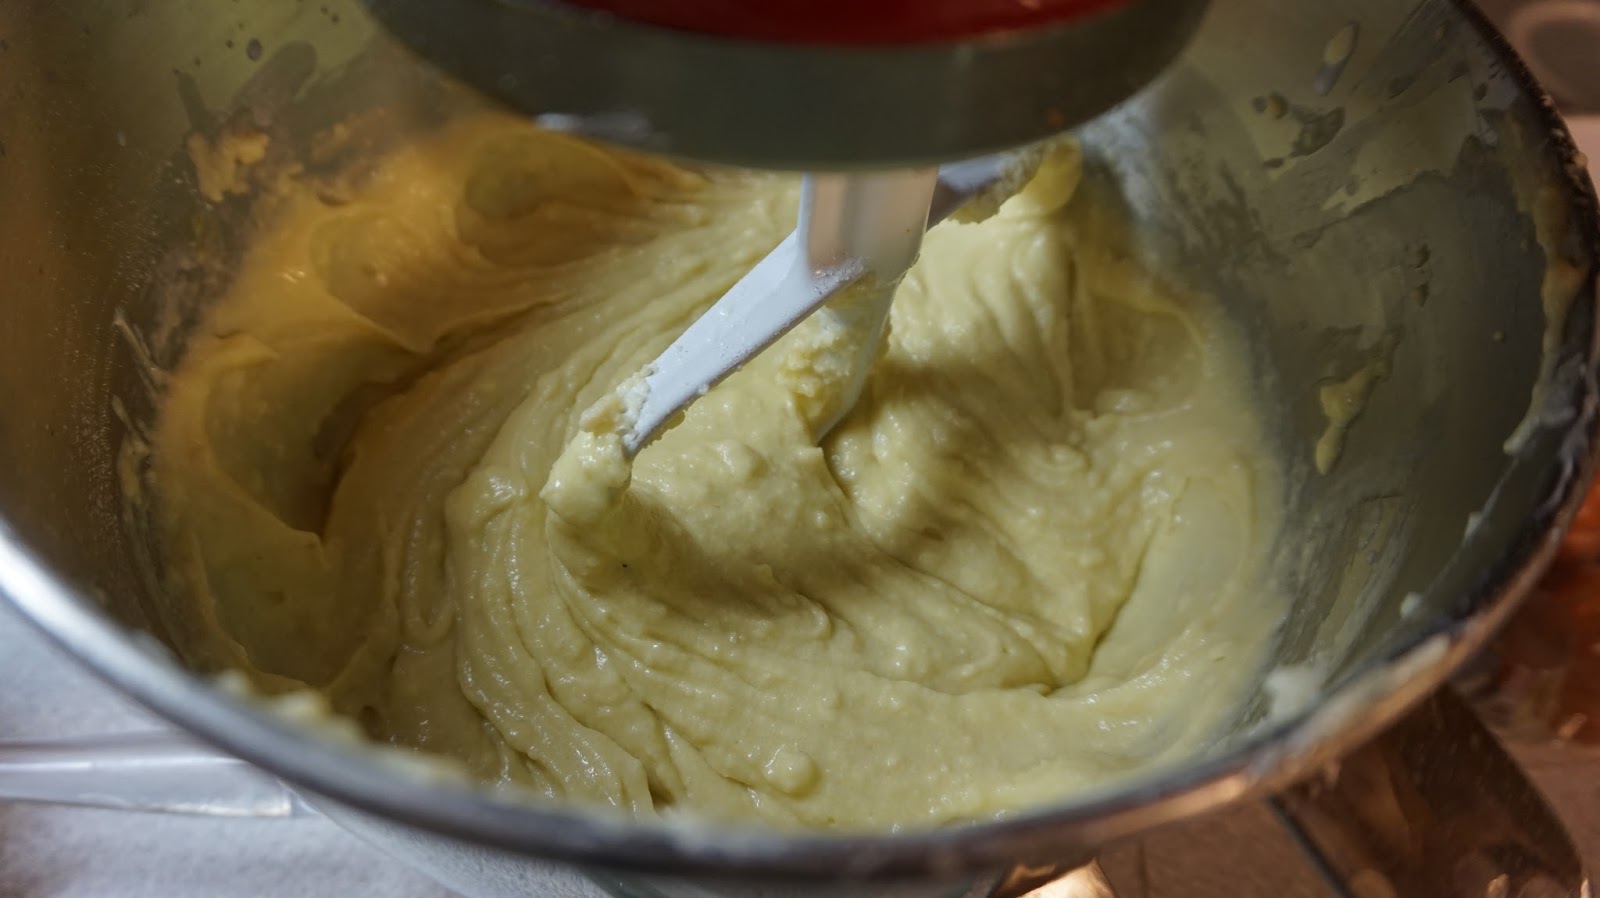
Mix together all the ingredients until just combined, try not to over mix.

Pour, and spread into the pan, and tap a few times on a flat surface to even out the layer, and to get out any air bubbles.


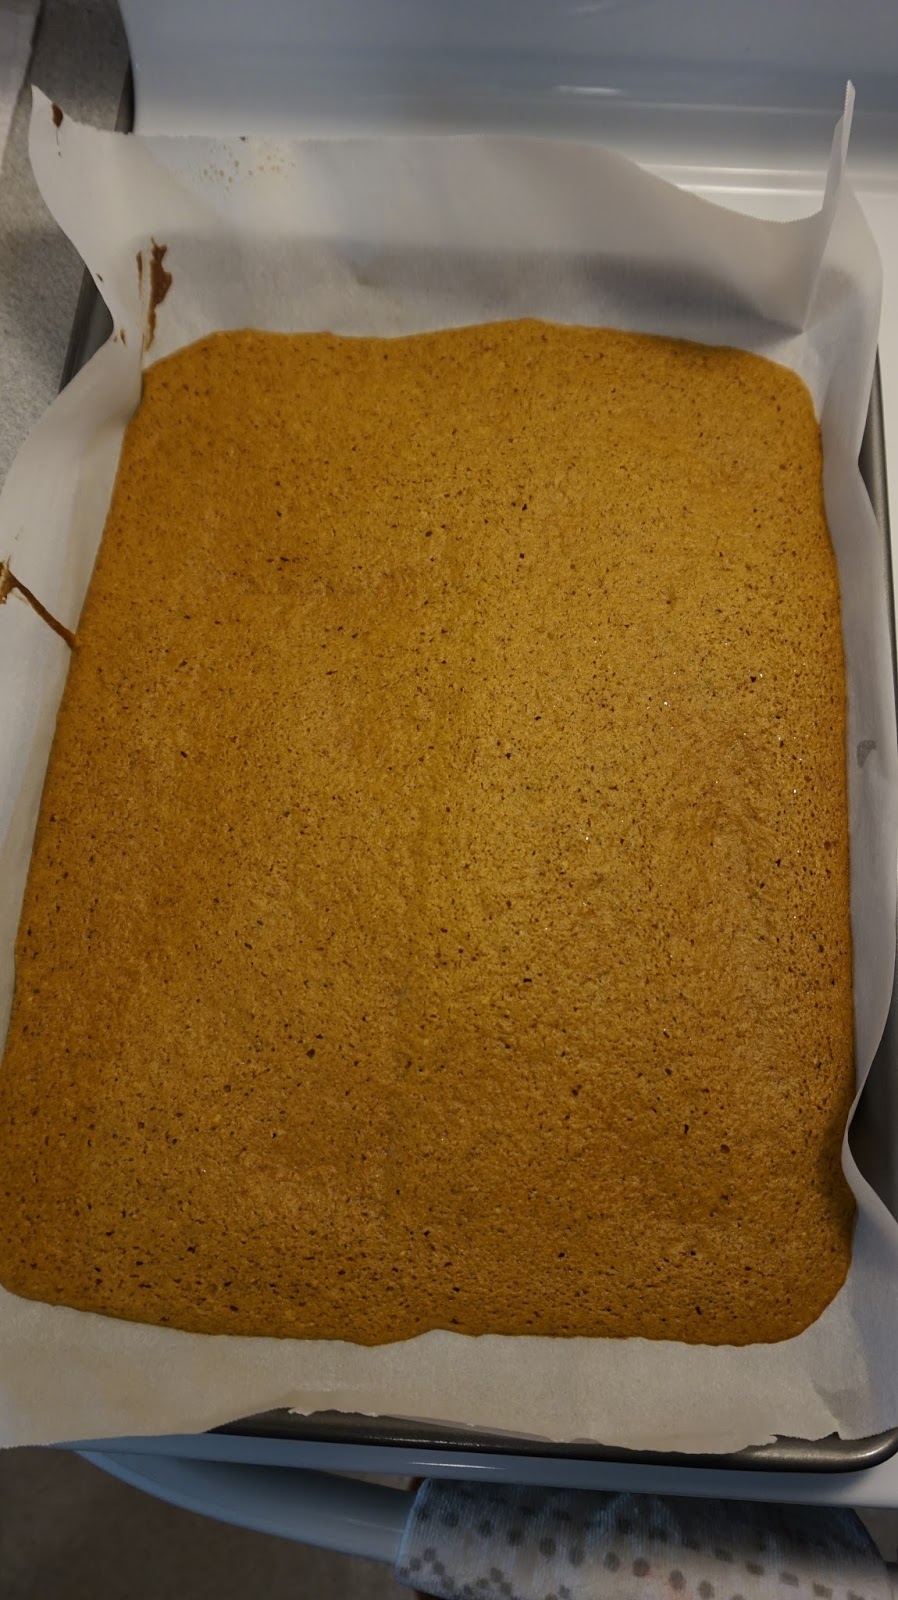
Bake for 13-15 minutes, until baked through, and remove from oven.

Let your cake SLIGHTLY cool, and turn out onto a towel that has been sprinkled generously with powdered sugar. *you may need gloves, but it should be fine if you work gently*


Remove parchment paper, and slowly and gently roll the cake & towel tightly into a roll, and let it rest for 45 min to an hour until it's COMPLETELY COOL. *This part is important. If you don't allow your cake to cool completely, it will crack and break when you try to fill/roll it.*


--Cinnamon Buttercream--
(makes just enough to fill the roll)
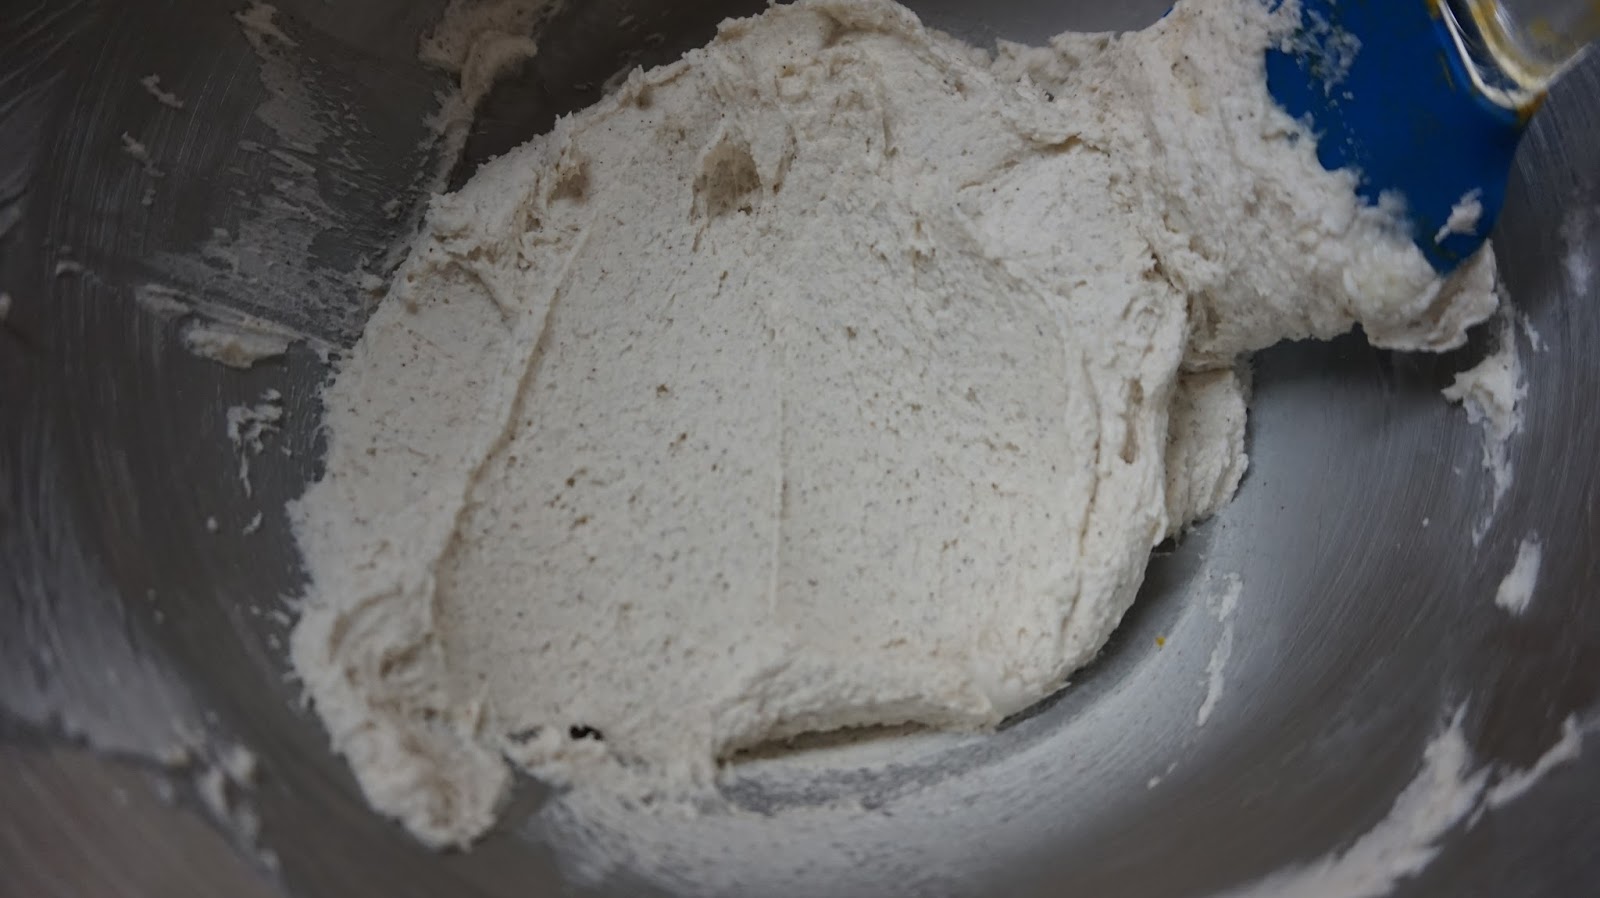
1 stick room temp butter
1/2 tsp vanilla
3.5 - 4.5 cups powdered sugar
1 tsp cinnamon
*1 tbsp milk, only if necessary*

Add butter to mixer, and cream for a minute. Add vanilla, cinnamon, and 3.5 cups powdered sugar and mix well, starting slow and working up to medium speed. Scrape down edges of bowl, and continue to whip. If the texture of the icing is too thin, add more powdered sugar 1/4 cup at a time. And if you ever add too much powdered sugar and your icing gets too dry, add a tablespoon of milk to thin it out a bit. Once the consistency is perfect and to your liking, you are finished.


Once your roll has completely cooled for 45 mins, Unroll, and carefully spread the buttercream evenly. Re-roll, and cut off any rough edges you may have.


You can sprinkle a little extra powdered sugar on top, to make it look pretty. I'd do that right before serving, bc it just soaks into the cake in the refridgerator. :)

Voila! That's all there is to it! I covered mine with plastic wrap and chilled it until 30 minutes before it was time to serve. Enjoy! Yum!

Wednesday, October 28, 2015

Halloween Treat: Frankenstein Cake

Hello all! It's been a while! As most of you know, we found out late August that we are expecting baby #2! We are so so excited! I have been very sleepy, and up until recently, I was nauseous all day everyday!

I told Will the other day I wanted to bake something sweet and he said, "Babe, you've really been slackin' on your blog!" GEE THANKS FOR REMINDING ME! SO, I figured I would do something similar to the Valentine's Day treats, and I'd show yall a few fun recipes and designs for easy Halloween themed treats and sweets!

I used a yellow cake recipe, but you can totally used a boxed cake mix! I just prefer the taste of scratch made cake! Also, you could use store bought frosting for the decorating, I just feel like scratchmade buttercream holds up better when doing more detailed designs! It's all about preference!

I hope yall try this out, it's super tasty and obviously, super cute and fun!


----FRANKENSTEIN CAKE----

**Yellow Cake Recipe**

2 3/4 cup all purpose flour
1 1/2 cups granulated sugar
1 tbsp baking powder
pinch of salt
1 cup of room temperature butter (2 sticks)
1 cup of milk
4 eggs
2 tsp vanilla

Preheat oven to 350F. Spray a 9x13 baking dish with non-stick spray, set aside.

Add flour, sugar, baking powder and salt to your mixing bowl, and whisk to mix. Add in your butter and milk, and mix until combined.

In a small bowl, gently whisk eggs and vanilla until eggs are well beaten. Add to the rest of the batter, and mix just until thoroughly combined. Some lumps are okay!

Pour into baking dish, and smooth over with a spatula. Bake at 350F for 40-45 minutes of until a toothpick inserted comes out with only a few crumbs.

Take your cake out, let it cool for about 20 mins in the dish, then turn it out onto a cooling rack to cool all the way through.

**Buttercream Frosting**

2 sticks of room temperature butter
3-4 cups powdered sugar
1 tsp vanilla
milk, cream or half&half -- enough to keep the texture you prefer (usually a few tbsp)
food coloring gel

In your mixer, whip your butter until light and fluffy. Add in powdered sugar, starting with just 2 cups, then 1/4 cup at a time, untilit reaches a nice firm but still light consistency. If you add a little too much powdered sugar, add a splash of milk or cream. Add your vanilla, and continue to whip.


Once your buttercream reaches your desired consistency, seperate into bowls, and add your food coloring. I only seperated a few tbsp for the white eyes, about a cup for the black hair/stitches, and the remaining I colored green for Frankenstein's skin!
(These are the colors I used to color my frosting)

* This recipe can be used for any kind of cake and colored any color! *

---- DECORATING THE CAKE ----

*make sure your cake is fully cooled before decorating, otherwise everything will melt right off!

Since none of the details on this cake need to be perfect, I didn't use my real piping bag or real piping tips. I put the frosting in small baggies and cut the tip off, and just smoothed it out with a small spatula when needed.

I laid down the green frosting first and smoothed it over the bottom 3/4 of the cake, and around the sides as well.

I then piped out some black around the top making sure I covered the top and sides of his head where his hair would be. I smoothed it out, then added more, and used my spatula to create the small strokes to look more hair-like.


(this is the spatula I used for all the spreading and smoothing, I just rinsed it between colors)
I squeezed the remaining black frosting into another bag, and cut a smaller hole so I could do his stitches and mouth.

I used white to pipe the whites of his eyes, then just a small black dot to finish it off!


And that's it! Such an easy design and it is so yummy! Kids and adults will both love it and gobble it right up!!

Saturday, July 25, 2015

Berry Crumb Bars

Hey all! It has been quite a while since I've been on here, and I just don't like that! My apologies to those waiting for recipes ;) I've been quite discouraged with this whole blog thing, but I guess I just need to write more to get more views. As long as people enjoy what I post, I will keep posting!

I was really in a baking mood today, but had no idea what to make... until I remembered I had two half full (or half empty ;) ) containers of berries in the fridge that were on their last leg. *Last leg, meaning still good, but only for another day or two before I'd toss them out* So I was going to do a cobbler, but I've never had cobbler before, so I didn't want to make something that would go to waste. That's when I was inspired by a recipe for Raspberry crumb bars. BARS. This caught my attention. I don't care for mushy fruit, surrounded my more mushy stuff. BARS sounded crisp and firm, which sounded perfect for me!

I didn't have any raspberries though, so I used strawberries, diced, and blueberries, whole. I really REALLY love how these turned out, and will absolutely be making these again with whatever fruits I impulse buy at Sam's Club on my next trip ;)

SO, If you're like me, and you love buying way too much fruit, then use this recipe to make yummy crumb bars!

Hope you enjoy!

---- Berry Crumb Bars----
makes approx 20 bars

2 sticks of cold butter (16 tbsp, cut into cubes)
1 cup, plus 1/2 cup of sugar, seperated
1 tsp baking powder
3 cups flour
1/4 tsp salt
zest of 1 lemon
4 cups fresh berries (I used blueberries and diced strawberries)
1 large egg, beaten
juice of 1 lemon
4 tsp corn starch

Pre-heat oven to 375 degrees. Grease a 9 x 13 pan, and set aside. (My pan was actually a 10 x 14, BUT it still worked just fine)


In a medium bowl, combine 1 cup of the sugar, the baking powder, salt, and the flour. Add in the zest of 1 lemon, the egg, and the cubed cold butter.


Using a pastry blender, (or a sturdy whisk) cut/blend everything together, until the pieces of butter are evenly distributed. The largest chunks of butter should be no bigger than a pea. * If you use your hands for this part, make sure the butter never gets too soft, otherwise put the bowl in the freezer for a few minutes before you continue*

 Your mixture should be crumbly, with little to no loose flour.


In another bowl, mix your berries, with the remaining half cup of sugar, the juice of 1 lemon, and the cornstarch.

Pour half of the flour mixture into the bottom of your pan, and press down making one solid layer.

Spoon the berries over the cookie layer, and make sure the layer is even and every bite gets some berries. Then sprinkle the remaining flour mixture over the berries, and bake for 40-45 minutes, or until the crumbles on top are golden brown.


Be sure to let the bars FULLY cool before even trying to cut them. I find it easiest to run my knife around the entire outer edge of the pan, then cutting the squares in whatever size you prefer.

These babies are so good... I couldn't help myself while I was snapping pictures!.....

HEY! Where'd that 4th bar go.... hehe ;)


ENJOY!!